
We've blogged before about the importance of model validation, a process that ensures that the model is performing the way it was intended and that it solves the problem it was designed to solve. Validations and tests are key elements to building machine learning pipelines you can trust. We've also talked about incorporating tests in your pipeline, which many data scientists find problematic. The issues stem from the fact that not all data scientists feel confident about traditional code testing methods, but more importantly, data science is so much more than just code. When validating pipelines we need to think about verifying the data integrity, inspecting its distributions, validating data splits, model evaluation, model comparison etc. But how can we deal with such complexity and maintain consistency in our pipelines? Enter Deepchecks - an open-source Python package for testing and validating machine learning models and data.
Note, that Deepchecks can be plugged at multiple stages in your model lifecycle - you'd probably want to inspect your data right after ingestion, but also make sure that there are no issues with your train and test sets after preprocessing has been completed. Deepchecks also facilitate the model evaluation stage by providing insights into the model's performance.

The package was initially created with tabular data in mind, but has recently been extended to support computer vision use-cases as well. According to its creators, NLP functionality is also currently in the making.
Getting started with Deepchecks
Installing the package is a piece of cake as it is already part of PyPI. The tabular data support is installed using
pip install deepchecks --upgradeand the flavor with computer vision support is installed using
pip install "deepchecks[vision]" --upgradeThe only thing to be mindful about is that the CV support also requires Pytorch, which you must install separately.

There are three different paradigms that the framework introduces and which you need to understand in order to effectively use Deepchecks:
- Checks - these are the main building blocks and they enable you to probe different aspects of your data/model. Generally speaking, there are three types of checks, categorized according to what stage of the ML pipeline they target: data integrity, train-test validation, and model performance evaluation. The result from running a check can be either a visual artifact (a table, a plot etc.) or a return value, which you could use together with a condition (see below)
- Conditions - functions that can be added to checks with a pass/fail/warning output. Most of the checks that Deepchecks provides out-of-the-box come with pre-implemented conditions, but you can easily add, remove, and customize those.
- Suites - ordered collections of checks with their corresponding conditions. Suites enable you to run a number of checks in one go and also display a summary report so you can see the full set of results neatly aggregated. Deepchecks provides a number of pre-built suites, but also gives you the capability of building your own by either customizing existing ones or just creating new suites from scratch.
A (not so) simple insurance fraud use-case
Now that we know some of the basics of Deepchecks, let's see how we can use the framework to analyze a problematic dataset. We'll use a modified version of a dataset on fraudulent insurance claims involving vehicles. This dataset is problematic at many levels and it is interesting to see how Deepchecks catches and helps address the issues. Note, that the code snippets below are taken from an end-to-end demo notebook, which is available here.
Data ingestion and validation
We begin by ingesting the raw data in a pandas DataFrame.
data_df = pd.read_csv("insurance_fraud.csv")
data_df.head()

The dataset contains various columns, both numeric, string categorical and datetime related.
The first step at which Deepchecks can help is when the data is "fresh from the oven", as you first load it. The first way in which Deepchecks can be used is by running pre-built suites, that contain multiple checks. Each check tests a single aspect of the data or the model, and can fail or pass its predefined "condition" independently.
Right now, we'll load the single_dataset_integrity suite and use it to detect issues with the integrity of the loaded data frame.
from deepchecks.tabular.suites import single_dataset_integrity
result = single_dataset_integrity().run(data_df)
result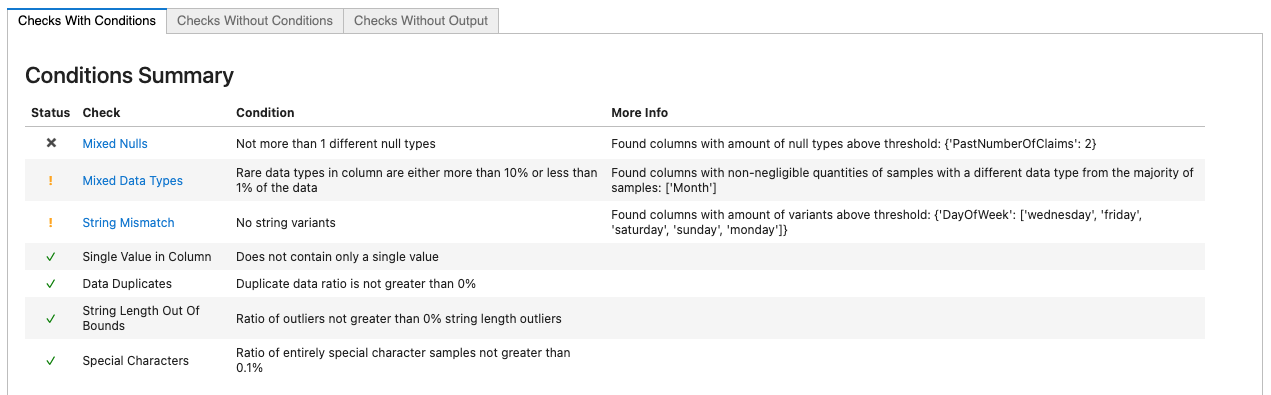
....
Right away the condition summary at the head of the result display alerts us to three checks who's conditions have failed. The first (marked with the x of a failed condition) tells us that we have several types of nulls in the column "PastNumberOfClaims". Clicking on the link in the Check column of that table leads us to the check display, which lets us know that the column has both the string 'none' and the numpy NaN value marking missing values in this feature.

The second failed condition (marked with the yellow "warning" sign to let us know it's not a critical failure) lets us know we have mixed data types in two columns. Further inspection shows we have a single sample that contains zeros at these columns.
data_df['DayOfWeekClaimed'][data_df['DayOfWeekClaimed'].str.isnumeric()]1146 0
Name: DayOfWeekClaimed, dtype: objectdata_df['MonthClaimed'][data_df['MonthClaimed'].str.isnumeric()]1146 0
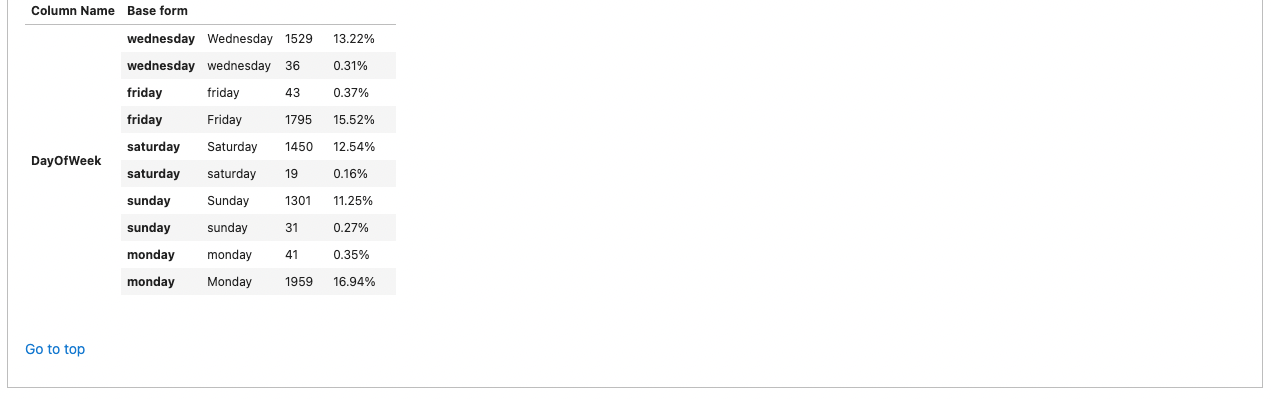
Name: MonthClaimed, dtype: objectLastly, the String Mismatch check alerts us to the presence of several different ways in which a single category (Month) is represented in string values.
data_df['Month'].value_counts()Jan 1014
May 975
Mar 949
Jun 937
Dec 925
Oct 923
Apr 917
Feb 913
Sep 908
Jul 907
Nov 864
Aug 806
5 53
10 50
11 49
3 46
12 45
8 45
6 44
9 44
4 42
1 42
2 36
7 31Data pre-processing and data validation
Instead of catching all these integrity issues while modeling (or worse, later on) we can now treat them all before moving forward.
data_clean_df = data_df.copy()
data_clean_df['PastNumberOfClaims'] = data_clean_df['PastNumberOfClaims'].fillna('none')
data_clean_df.drop(index=1146, inplace=True)
data_clean_df['Month'] = data_clean_df['Month'].replace({str(i): datetime.date(1900, i, 1).strftime('%b') for i in range(1, 13)})
data_clean_df['DayOfWeek'] = data_clean_df['DayOfWeek'].str.lower()
We can now rerun the Deepchecks suite to see that we got rid of all these integrity issues.
single_dataset_integrity().run(data_clean_df)
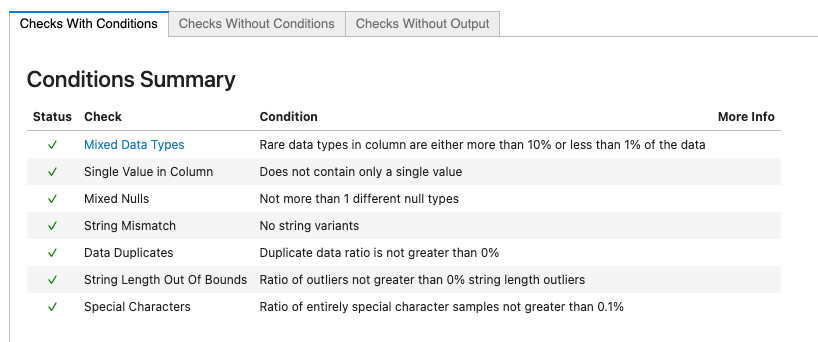
All Clear! We can continue to prepare the data for model training.
Now we do some additional feature pre-processing, to help the model out. We noticed that some of the attributes contained missing values. Let's do a light feature engineering step to replace the strings like "none" and "new" with the proper missing value designation based on the specific attribute type. For this purpose we'll use the following function:
import re
def str_to_mean(str_val):
    if isinstance(str_val, (int, float)):
        return str_val
    if str_val.lower() == 'none':
        return np.nan
    if str_val == 'new':
        return 0
    parts = re.findall(r'\d+', str_val)
    parts = list(map(int, parts))
    if len(parts) < 1:
        raise ValueError(str_val)
    return np.mean(parts)
Now let's apply it to the attributes in question:
data_clean_df['VehiclePrice'] = data_clean_df['VehiclePrice'].apply(str_to_mean)
data_clean_df['Days_Policy_Accident'] = data_clean_df['Days_Policy_Accident'].apply(str_to_mean)
data_clean_df['Days_Policy_Claim'] = data_clean_df['Days_Policy_Claim'].apply(str_to_mean)
data_clean_df['AgeOfVehicle'] = data_clean_df['AgeOfVehicle'].apply(str_to_mean)
data_clean_df['AgeOfPolicyHolder'] = data_clean_df['AgeOfPolicyHolder'].apply(str_to_mean)
data_clean_df['NumberOfCars'] = data_clean_df['NumberOfCars'].apply(str_to_mean)
data_clean_df['PastNumberOfClaims'] = data_clean_df['PastNumberOfClaims'].apply(str_to_mean)
We also need to handle the "AddressChange_Claim" attribute by either unpacking it to binary variables or expressing the duration numerically. We'll do the latter for the sake of simplicity.
data_clean_df['AddressChange_Claim'] = data_clean_df['AddressChange_Claim'].replace(
{
    'no change': 10,
    '4 to 8 years': 6,
    '2 to 3 years': 2.5,
    '1 year': 1,
    'under 6 months': 0.5
})
Finally, we need to split the data into training and test sets. Before we do it, however, let's just take a look at how the samples are distributed per class for each of the years in the dataset. This way we can do the split according to year, which is the correct way of handling splits when the data features a temporal component.
data_clean_df[['Year', 'FraudFound_P', 'Month']].groupby(['Year', 'FraudFound_P']).count()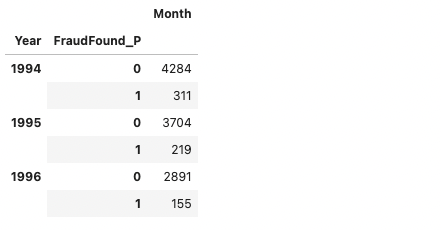
We now split the data in such a way that all observations dated in 1994 will be used for training the model and everything else will be used for evaluation.
train_df = data_clean_df[data_clean_df.Year == 1994]
test_df = data_clean_df[data_clean_df.Year > 1994]
Normally right after this step, we'll go straight ahead to try to experiment with some models, and who can blame us! But Deepchecks offers a special pre-built suite of checks designed to detect issues with the way the dataset was split. We'll run this suite just to make sure.
In order to access Deepchecks more advanced functionalities, we must tell it some more about our dataset. What is the label? What are the categorical features? In order to do that, we use the Deepchecks Dataset object that wraps our DataFrames and also includes this metadata information.
We start by creating a list with all categorical variables.
from deepchecks.tabular import Dataset

cat_cols = ['Month',
 'WeekOfMonth',
 'DayOfWeek',
 'Make',
 'AccidentArea',
 'DayOfWeekClaimed',
 'MonthClaimed',
 'WeekOfMonthClaimed',
 'Sex',
 'MaritalStatus',
 'Fault',
 'PolicyType',
 'VehicleCategory',
 'PoliceReportFiled',
 'WitnessPresent',
 'AgentType',
 'NumberOfSuppliments',
 'BasePolicy']
We also need to tell Deepchecks what our datetime indicator is. Here, it's the Year column. Deepchecks can then alert on cases in which the split contains time leakage, though in this case we know we split correctly such that the test data comes after the training data in time. Note that we also indicate the target variable used in the splits.
train_ds = Dataset(train_df, label='FraudFound_P', datetime_name='Year', cat_features=cat_cols)
test_ds = Dataset(test_df, label='FraudFound_P', datetime_name='Year', cat_features=cat_cols)
We now run the train_test_validation suite, built exactly for validating our split. This may take some more time than the integrity checks, due to some more complex logic being run.
from deepchecks.tabular.suites import train_test_validation

res = train_test_validation().run(train_ds, test_ds)
res
This is what the report's summary looks like:
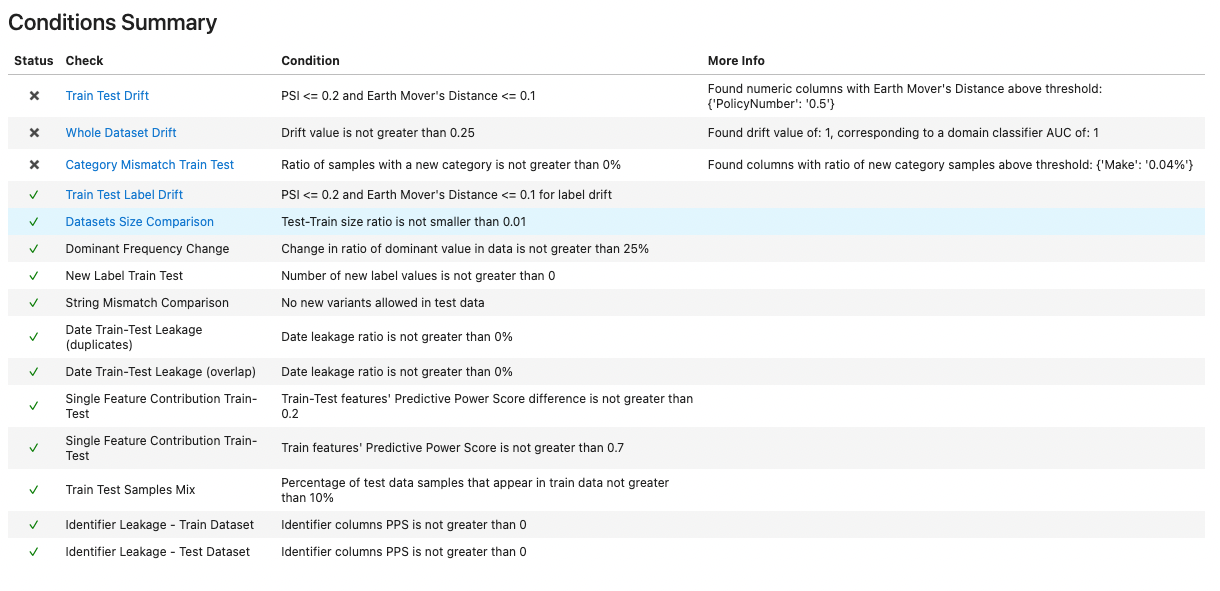
We have a number of failures. Looking deeper, we see two issues in our split:
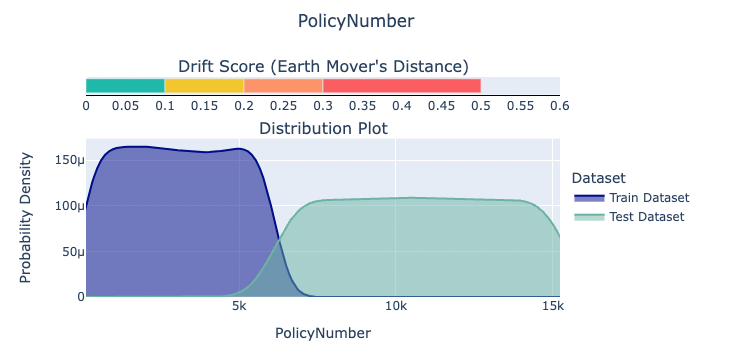
- The feature drift check, designed to detect changes in distribution of single features between the train and test datasets, has by chance caught a completely different issue - we've missed that the PolicyNumber column is actually a running index of insurance policy, and completely unfit to be used as a feature.
- The Category Mismatch Train Test check has alerted us to the fact that a categorical feature "Make" has some new categories in the test data that didn't exist in the training data. This, if input to the model, is sure to cause some confusion, if not downright exceptions.
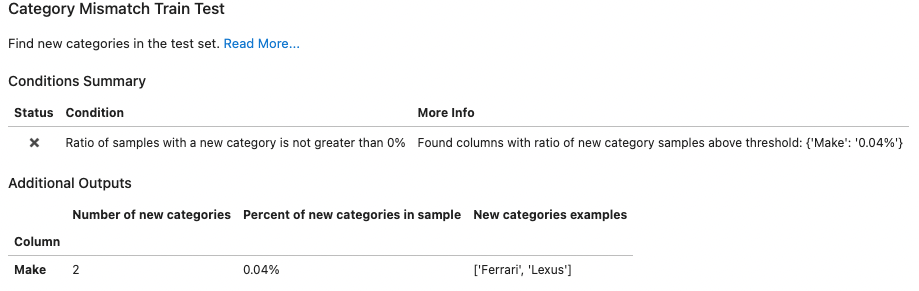
Let's quickly remedy these issues. First, we remove the extra categories that appear in the test set.
test_df = test_df[~test_df.Make.isin(['Ferrari', 'Lexus'])]We can also tell Deepchecks that PolicyNumber is our index column and not a feature by explicitly passing PolicyNumber as index_name. In case of additional non-feature columns, we can explicitly define which columns will be considered features by Deepchecks by passing a list to the feature argument of the Dataset object.
train_ds = Dataset(train_df, label='FraudFound_P', datetime_name='Year', index_name='PolicyNumber', cat_features=cat_cols)
test_ds = Dataset(test_df, label='FraudFound_P', datetime_name='Year', index_name='PolicyNumber', cat_features=cat_cols)
Let run the validation again and see if our changes resolved the problematic findings.
res = train_test_validation().run(train_ds, test_ds)
res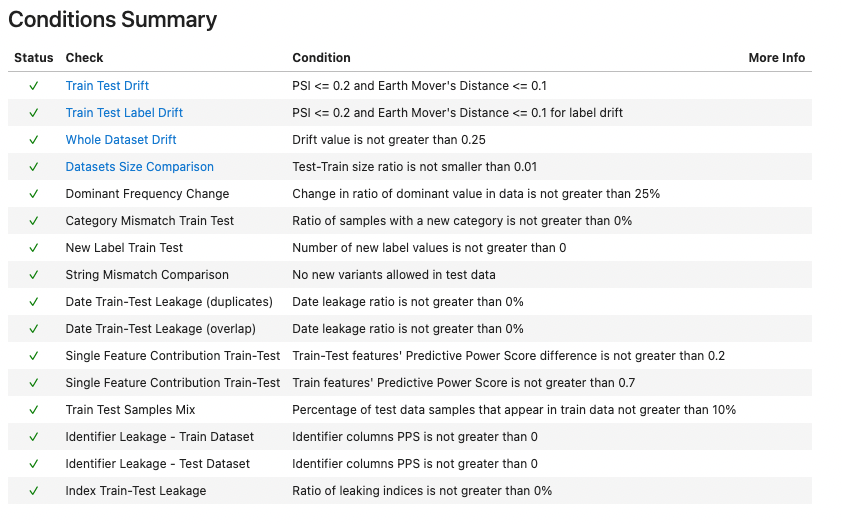
Alternatively, instead of inspecting the whole output again, we can do something more Pythonic - we can go over the results of each of the individual checks (accessed in a list returned by the property named .results) and make sure their conditions have passed.
all(res.results[i].passed_conditions() for i in range(len(res.results)))TrueAgain, all clear! We can finally move on to training our model.
Model training and validation
For fitting the model we'll use CatBoost, a high-performance open source library for gradient boosting on decision trees. We'll create a CatBoostClassifier instance, which is used for training and applying models for classification problems. This class also provides compatibility with the scikit-learn tools.
from catboost import CatBoostClassifier

model = CatBoostClassifier(iterations=100, random_seed=42, verbose=0)
model.fit(train_df.drop(columns=['FraudFound_P', 'Year', 'PolicyNumber']), train_df['FraudFound_P'],
          cat_features=cat_cols)
<catboost.core.CatBoostClassifier at 0x7f4e436614f0>Now that we have a trained model, let's look at how Deepchecks can help with mode evaluation.
from deepchecks.tabular.suites import model_evaluation
res = model_evaluation().run(train_ds, test_ds, model)
res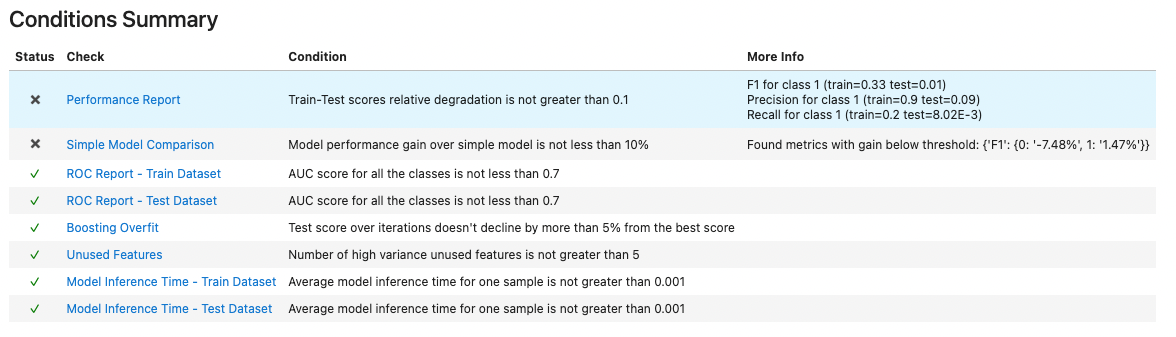
The summary shows that our model is somewhat problematic. For example, we see that it has nearly identical performance compared to a constant model, which always outputs class 0. This is caused by the high imbalance of the two classes.

Let's retrain the model to address the unbalanced classes.
model = CatBoostClassifier(iterations=100, random_seed=42, verbose=0,
                           scale_pos_weight=np.sqrt(len(train_df[train_df['FraudFound_P']==0]) / len(train_df[train_df['FraudFound_P']==1])))
model.fit(train_df.drop(columns=['FraudFound_P', 'Year', 'PolicyNumber']), train_df['FraudFound_P'],
          cat_features=cat_cols)
<catboost.core.CatBoostClassifier at 0x7fa92f1e5640>We mentioned in the beginning that Deepchecks also supports custom suites - a list of checks that will run one after the other, and its results will be displayed together. Let's use this functionality to define a custom suite, which performs the following:
- runs a check that verifies test performance is not degraded by more than 0.1% compared to train
- generates a confusion matrix for the model and includes it in the report
- checks for overfit caused by using too many iterations in a gradient boosted model
- uses a simple model heuristic to establish a baseline and verify that the model's performance against the baseline is at least 10% better
The code for setting up and running the custom suite is pretty self-explanatory.
from deepchecks.tabular import Suite
from deepchecks.tabular.checks import PerformanceReport, BoostingOverfit, SimpleModelComparison, ConfusionMatrixReport

custom_suite = Suite('My Custom Performance Suite',
                     PerformanceReport().add_condition_train_test_relative_degradation_not_greater_than(0.1),
                     ConfusionMatrixReport(),
                     BoostingOverfit(alternative_scorer=['f1', 'f1']).add_condition_test_score_percent_decline_not_greater_than(0.01),
                     SimpleModelComparison().add_condition_gain_not_less_than(),
                    )

custom_suite.run(train_ds, test_ds, model)
We see that three of the checks have failed. One of them indicates that the model is overfitting, and it could be the cause for the other two being triggered as well. Let's retrain the model and change some of the parameters that could alleviate the overfitting issue. For example, we can reduce the number of training iterations, restrict its depth etc.
model = CatBoostClassifier(iterations=50, random_seed=42, verbose=0, learning_rate=0.2, colsample_bylevel=0.03, subsample=0.5,
                       depth=4,
                           scale_pos_weight=len(train_df[train_df['FraudFound_P']==0]) / len(train_df[train_df['FraudFound_P']==1]))
model.fit(train_df.drop(columns=['FraudFound_P', 'Year', 'PolicyNumber']), train_df['FraudFound_P'],
          cat_features=cat_cols)
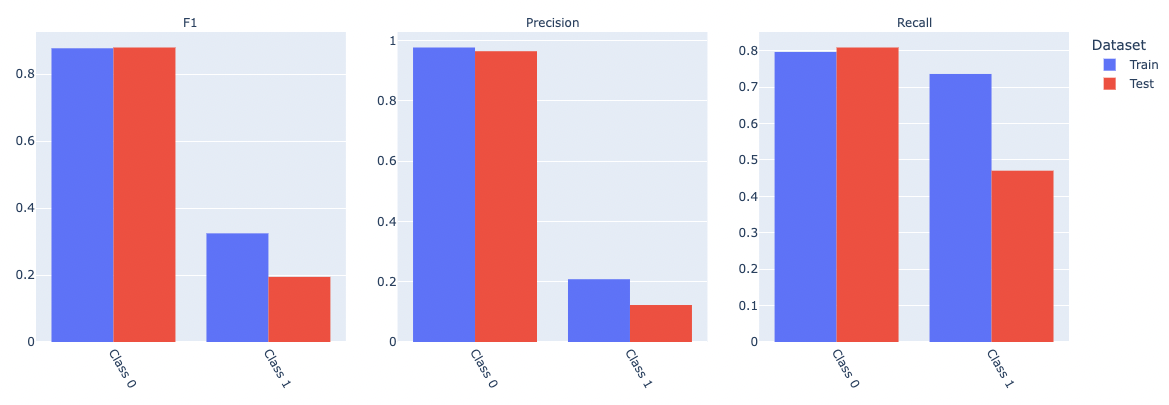
This time we see that the Boosting Overfit check has become green. We can also see that the F1, Precision, and Recall metrics across train and test are improved. We are not there yet in terms of performance, but this is mostly due to the data imbalance (this can easily be seen in the Simple Model Comparison details). Rectifying this, however, is accomplished by other techniques (see Synthetic Minority Oversampling (SMOTE) Technique) and is not in the scope of this article.
Summary
In this article, we looked at Deepchecks - an open-source package, which enables you to build test suites for data and model validation. We showed some of its core functionality and saw how useful the framework can be at various stages of the model lifecycle. Here we used Deepchecks to:
- evaluate a new dataset, which were not familiar with
- ensure that the train/test sets were split correctly without data leakage
- inspect the performance of our model
We didn't explore any of the computer vision-specific functionality, which definitely sounds promising. It is also worth noting that the team of self-described "machine learning geeks'' behind Deepchecks is aggressively adding new functionality. For example, model comparison and model explainability are two items on the Deepchecks' roadmap that sound especially interesting.
Deepchecks already has a number of enterprise customers like DataDudes. Nathaniel Shimoni, Co-CEO @ Datadudes says "We’ve been using Deepchecks to validate our data each time we get a new test set as well as before we deploy to production. My team and I love the package and we’re planning to expand the usage to other phases as well".
Being an open source also plays to Deepchecks' advantage. It is fairly straightforward to couple the framework with H2O models, Airflow CI/CD pipelines, pytest test cases HuggingFace Transformers and, of course, the Domino Enterprise MLOps Platform.

Noam is Deepchecks' Data Science lead, where he directs the development of algorithms and Machine Learning methodologies for validation of Machine Learning models and data. Noam holds an MSc in physics and previously served as a Data Scientist and Algorithms Researcher, developing ML and analytical models in the domain of acoustic signal processing in the IDF.
SHARE


Subscribe to the Domino Newsletter
Receive data science tips and tutorials from leading Data Science leaders, right to your inbox.
By submitting this form you agree to receive communications from Domino related to products and services in accordance with Domino's privacy policy and may opt-out at anytime.